Pages

Showing posts with label party. Show all posts

Sunday, 6 April 2014

It's all about the chocolate ...

We decided on a chocolate theme for Sophie's 8th birthday party this year. Originally I was thinking that the party guests could make lots of chocolate goodies (such as chocolate pizza and chocolate rice krispie cakes) but when Sophie came up with a guest list of 20 children I knew that this wasn't going to be feasible, so Plan B was created.

Plan B swiftly took shape with some help from Pinterest (where else would you go?) and I came up with games involving huge amounts of chocolate to fill the two hour party. As always, I did the planning and pulling the activities together and Mr Snowballs did the amazing job of keeping 18 children entertained and stuffed with chocolate goodies on the day.

I couldn't find any invitations I liked that included chocolate so I came up with a simple one made from chocolate jazzies stuck onto rice paper with a bit of melted chocolate, and the rice paper stuck onto the invitation with the party information printed on the back (the rice paper stopped the oil from the chocolate "glue" seeping through and spoiling the back of the invitation). Sophie drew the ribbons and bow for each balloon. Feedback was that many of the parents didn't get to see the "balloons" as they were consumed pretty swiftly. And a word of advice to anyone thinking to copy this, make sure the pens and glue glueing the rice paper onto the invitation are non-toxic as the rice paper was also peeled off and eaten by quite a few of the children!!
As I mentioned above, the party was full of games that involved chocolate in lots of ways: including chocolate anagrams to start, guess the chocolate bar (you could tell the chocoholics straight away in this game as they were the only ones to get almost all the answers correct!) ...
 ... pass the chocolate orange without using your hands ...
 ... chocolate dress up (where you roll a dice and when you get a six you have to put a coat and gloves and scarf on and cut off squares of chocolate using a knife and fork!) ...
 ... moving smarties from one plate to another using suction power through a straw (they were surprisingly good at this) ...
 ... and my favourite, chocolate kisses, where you place a square of chocolate on the party guests lips while they are lying down and the last person to eat the chocolate wins. A lot harder than it sounds as the chocolate starts melting.
 Mr Snowballs made it harder by adding slices of chocolate orange along the way!
After each game, the winning children (everyone was a winner according to Mr Snowballs) got to visit the Chocolate Shop for a small chocolate prize. By the time it came to sitting and eating the birthday tea, lots of the children were suffering from chocolate overload. Some judicious eating of cool carrot sticks and they were ready to tackle the chocolate fountain, which they had all been waiting patiently for since they spotted it at the start of the party!
Chocolate overload or not, the children had a great time and the party girl enjoyed it more than all the rest. And Mummy enjoyed the mountain of chocolates left over for the next week!!

I am just launching a series of Host Your Own Party guides. These are aimed for those of you who want to host a great party for your child but don’t know where to start? The Host Your Own Chocolate Party pack gives you all the information you need to organise and run a chocolate-tastic party and all for only £4. Send me a mail for more information or if you would like to buy the guide.


© 2014 Nicola Noble: Please observe the rules of copyright and blog etiquette. If you use my ideas or images, please link back to my blog. And do let me know - I'd love to take a look.

Monday, 27 January 2014

Explore, rescue, protect! An Octonauts party ...

Justin was five a few weeks ago and he wanted an Octonauts party.

I managed to get the invitations out before Christmas: I found a cute picture of the front of an Octonauts book and fiddled a little to come up with something I was happy with.
I was very late in organising the actual party (for me) and only sat down and planned the games the day before the party, although I had sourced the party bag goodies and party plates before Christmas (as I learnt to do after his very first birthday when I left it until after Christmas and snow meant the things didn't arrive in time!) 

Justin had 10 friends and the party was held at our local community centre (where we've held previous parties). I bought a blue net and some inflatable fish to decorate the room and we made some jelly fish out of plastic food cartons and plastic carrier bags.
We started the party with an Octonauts Creature Hunt. I was "forced" to play some of the Octonauts games on the BBC website to win some creature cards, which I saved and printed out. These were then hidden around the room  and each child was given a creature chart at the start of the games. Once they spotted the creature they then went to Sophie and her friends (the helpful big girls) to get the creature stamped off with a froggy stamp (the closest stamped we had to a sea creature!).
Next game was Fish Egg and Spoon Race. We have a great set of egg and spoons from Early Learning Centre and the children had fun running up and down the hall trying not to drop the eggs!
After that the children played Ball Pool Creature Rescue. I filled a giant bucket with ball pool balls and dropped in selection of sea creature bath toys. The children then had to reach into the bucket and pull out one of the sea creatures (without looking).

The next game was Musical Islands. We laid out large pieces of paper (the packaging saved from a recent Amazon delivery!) - one for each child. The children danced around the islands until the music stopped - they then had to stand on an island. An island was removed after each round and the child not on an island was out of the game. The last one on an island won.

This was followed with Calico Jack’s Treasure Hunt. I have been saving the plastic eggs from Kinder eggs for a very long time and I put a haribo sweet into each egg and hid them around the hall. There were enough for each child to find three eggs and two of these were large ones with a mini-packet of Haribos in.

The final game before the food was served was Octonauts in the Sea (this was a variation of fishes in the sea). The proper game works like this: set up a circle of chairs facing outwards and each child sits on a seat and is named either Captain Barnacles, Kwazi or Peso. A caller calls out one of the names and the children with that name get up and walk around the outside of the circle. The caller then calls different things:
- the sea is getting rough = the children start running
- tide turn = the children change direction
- shark coming = the children run back to their chair.
The last child to return to their chair is out and turns the chair facing inwards; they can play a version in the middle of the circle for fun.

In reality this proved a bit too tricky for 4/5 year olds and Mr Snowballs just got them all up at the same time and got them to run or change direction or return to their seats as per the game rules. They all had lots of fun.

I also set up a table with some Octonauts colouring as a quiet activity for those children who didn't want to take part in every game.

The party bags were just simple paper bags with a label for each child in the Octonauts logo. I found a font that is similar to the Octonauts font and used this (see here). They each got an inflatable fish, a magic fortune teller fish (remember those from your childhood?), an Octonauts colouring book (I saved the images from the BBC website and then printed them four to a page and stapled them into a booklet), and some sweeties.
Mr Snowballs excelled himself this year with running the games and all the children had a fantastic time - even the shy ones were joining in by the end of the party. And with all the help I got from my family (who are amazing) the party was a real pleasure to organise and run.

Next up, the cake ...

© 2014 Nicola Noble: Please observe the rules of copyright and blog etiquette. If you use my ideas or images, please link back to my blog. And do let me know - I'd love to take a look.

Saturday, 16 March 2013

Cupcake birthday party

Sophie's 7th birthday party was last Saturday and it was a great success.

I had done a fair amount of preparation for it over the last month, so the last few days before the party were really rather relaxed - all I had left to do was bake 50 odd cupcakes for the girls to decorate, colour up a gallon of butter icing and make the birthday cake.

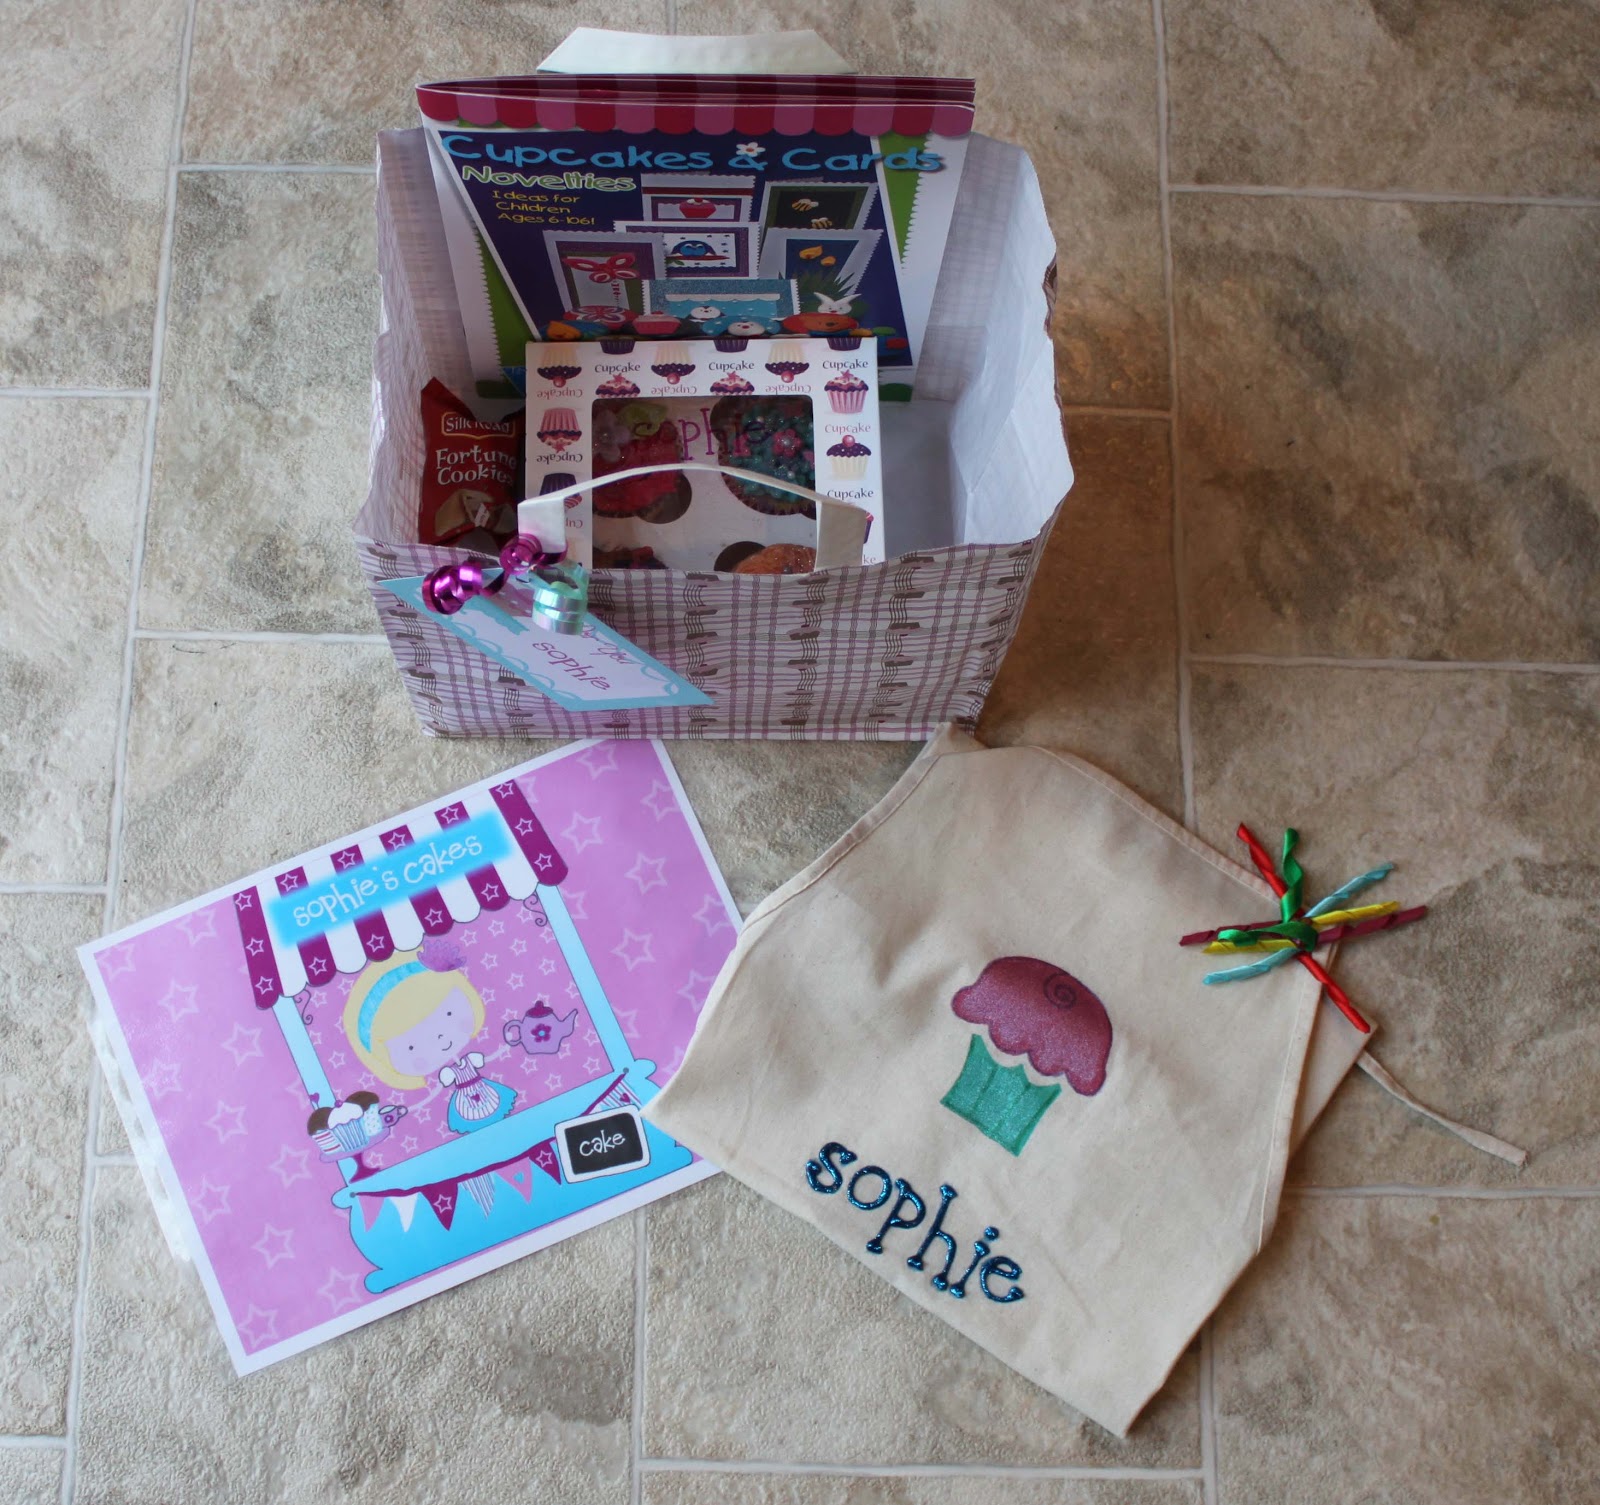
I didn't plan to do much in the way of going home gifts as the girls were having a personalised apron each and were going to decorate and take home four cupcakes each; but one thing led to another and they ended up with a lovely selection of other things too.

There is a wonderful tea and cake shop in Twickenham called Sweetie Pies Boutique Bakery, and I knew that they had gorgeous paper bags with cupcakes printed on, big enough to hold a four cupcake box. I often pop in for a cup of tea and a warm scone with cream and jam (well not that often otherwise I would have to run twice twice as much as I do!) and they very kindly let me have 10 bags for the party girls. I found and downloaded a cute cupcake tag which I personalised and attached to each bag.
In addition to the personalised aprons (see my previous blog here) and the box of cupcakes (I was really lucky in the timing when I bought these as they were 50% off in Sainsbury's), I also created a personalised laminated mat for each girl and I was given some amazing cupcake decorating books by the very generous Ann Pickard (who makes all the cupcakes for a brand new magazine called Cupcake Kate). We also popped a fortune cookie into each bag for luck!
The party was held at our local community centre (Sophie has had her last few parties there as it's five minutes away, amazingly cheap to hire and has a fully functioning oven which is great for cooking pizza). There is loads of space and the tidying up takes very little time. It worked very well this year as we set up four "stations" for each of the party activities: a pizza station; a cake decorating station; a smoothie station; and a food table. We decorated the hall with some beautiful cardboard bunting, some pink tulle and crepe flowers that I had kept from Sophie's fifth birthday, some paper honeycomb balls and lots of balloons - pretty!
The "pizza station" had a personalised paper plate for each girl and they put the toppings of their choice onto a pitta bread. Toppings included ready made tomato sauce, ham, pineapple, olives, sweetcorn, yellow pepper, cherry tomatoes and cheese. The named plates meant that once cooked, we could be sure each girl had the pizza she had made!
The "cupcake station" had the laminated mats for each girl with a decorated paper plate. There was a choice of five different coloured butter icings, bagged up with a selection of different nozzles, and sealed at the end with a couple of twists of the bag and a bag clip to stop it getting too messy.
I chose a selection of sprinkles that I thought wouldn't be too messy (ie avoiding the non-pareils/ hundreds and thousands I could picture going everywhere) including tiny butterflies, silver and pearl balls, red heart sprinkles, some loveheart sweets and M&Ms plus a few fondant flowers and stars that I had pre-cut. I also provide the girls with a selection of bright coloured fondant sugar paste and some cutters (flowers, leaves and stars). 
Essential items also provided were a couple of simple chopping boards that I use for my cake decorating, various small rolling pins and an icing sugar shaker for use when they were cutting shapes out of the fondant. I also placed a damp j-cloth for each girl to wipe their hands on if they got sticky and these were brilliant (I cut a full size one in half for each girl).

Each girl got to decorate five cupcakes - four to take home and one to eat at the party. Once I showed them how to hold and use the piping bags and how to cut the fondant shapes, they let their imaginations and creative skills run wild and we were all really impressed with how lovely the finished cakes turned out. These then got put into their cupcake box (which I had named) and the filled boxes then got put into their party bag, ready to take home.

I provided milk and various fruit for the smoothies: frozen strawberries and blackberries that we had picked at the end of last summer; bananas (that I peeled and froze the day before); tinned mango; milk; and apple juice for those who didn't like/couldn't have milk. The frozen fruit meant that we didn't need to add any ice or ice cream to thicken the smoothies. The finished blended smoothie got poured into a glass bottle with a cute pink stripe paper straw.
The bottles were another amazing find. I have seen lots of parties with gorgeous glass bottles for the drinks and I wanted to do the same. Doing my research before the party, it turns out the old school milk bottles that can be bought online only hold 100ml which really is about a mouthful and a half. I was really lucky to visit a garden centre cafe near to my mum's house and saw some perfect bottles on their tables holding flowers. After asking if I could have some (nothing ventured, nothing gained) the cafe told me they had no glass recycling facilities and were very happy to give me some. I took five with me and my mum collected the rest a week later (labels already removed to boot!) I tied white and pink raffia bows around the top and added a pink stripe paper straw to finish.

The "food table" was covered in a cupcake table cloth which was pretty but the bottles didn't really show up that much - a plain cover may have worked better but I did like the bright cupcake cloth.
The pizzas were served and I have to say the girls ate every bit of them, so much so that they took a long time to eat their food and didn't get around to the other bits of food on the table and their fifth cupcake until just before the parents arrived.
Despite a few tears from the party girl at the beginning (isn't that part of every party?) the whole thing went really well. Even Justin enjoyed it, despite being surrounded by 10 big girls; he made his own pizza and decorated his own cupcakes, eating half of them there and then! I even heard a few of the girls telling their parents that it was the best party they had EVER been too and that they wanted the same thing for their parties!

I really couldn't have done it without the support of my amazing family, Mr Snowballs (in charge of pizza making and helping with cakes) big sis (in charge of smoothies and helping with cakes), my mum (being everywhere she was needed right when she was needed) and my dad (in charge of the vacuum cleaner at the end of the party)! I really do value their support and know there is no way my children could ever have the parties they do without them - thanks xxx
© 2013 Nicola Noble: Please observe the rules of copyright and blog etiquette. If you use my ideas or images, please link back to my blog. And do let me know - I'd love to take a look.

Sunday, 24 February 2013

Cupcake birthday party - personalised aprons

I wanted the girls at Sophie's cupcake party to have their own aprons when they were decorating their cupcakes and these would make up part of their going-home gifts.

I toyed with the idea of letting them decorate the aprons themselves as one of the party activities but realised early on that this wouldn't work: paint and glue-on decorations wouldn't dry in time for the girls to wear the aprons when they were decorating their cupcakes; fabric markers wouldn't do either as the ones I have are too fine and it would be an extra (expensive) cost to buy new ones; and the girls are not old enough and it would take too long to sew anything onto the aprons. So that left me with creating the aprons myself before the party.


I also toyed with the idea of actually making the aprons myself. There are lots of very cute and apparently simple-looking designs out there but as my sewing skills are limited and it would take me a long time to make 10 aprons, I resorted to buying ready made aprons and concentrating on decorating them. I searched around and found some very simple plain unbleached cotton ones from Crafty Crocodiles which were inexpensive and perfect.

Next step was to create the design. I found a simple cupcake picture that I liked and used this as a template to cut some foam stamps, one for the case and one for the cake. I taped a triangle of cardboard to the back of each stamp to give me something to hold as I stamped them onto the fabric. I used some sparkly acrylic paint that I already had (diluted with water to make it less stiff on the fabric once dried) and stamped a cupcake onto each apron. I separated the case and cake and stamped the cupcakes in various combinations of colours. Once dry, I outlined the design with a fabric pen and added the swirl at the top of the cake.
The finishing touch was to write each girl's name in 3D glitter fabric paint. I found a font I liked, then printed the names onto plain paper before tracing them onto the apron (the aprons were thin enough that I could see the writing through the material). Once dry, I ironed the reverse of each apron and folded neatly, ready for the party.

 
The final touch to each apron was a curly ribbon brooch pinned in the top corner. I made the curly ribbon (from an abundance of ribbon that I already had) by wrapping the ribbon around a wooden skewer and securing each end with a wooden clothes peg before baking in the oven at a very low temperature for about 25 minutes. Once cooled the ribbons kept the curl.

For each brooch, I cut the ribbon into shorter lengths and took a selection of colours which I pushed onto the pointy end of the safety pin, then twisted the ribbon around the loop of the pin onto the opposite side (so that it doesn't fall off when the pin is opened and the pointy pin part can then be used to attach the brooch to the apron). This can be quite tricky to begin with but once you get the hang of it it's very simple.

I finished off each brooch by sewing on a sparkly flower bead to the middle of the curly ribbons; the beads came from a pretty bracelet I found in Claire's Accessories and subsequently dismantled.
Since the ribbon was from my stash, the colours weren't as coordinated with the cupcake design and writing as I probably would have preferred, but in hindsight I think that the complete mix of colours adds a brightness that works well and stops the aprons being slightly too sickly!! 
So another thing done on the party preparation list, and I hope the girls like their personalised aprons (and don't get them too messy when they are decorating their cakes!).

© 2013 Nicola Noble: Please observe the rules of copyright and blog etiquette. If you use my ideas or images, please link back to my blog. And do let me know - I'd love to take a look.

Wednesday, 13 February 2013

Cupcake birthday party - the invitations

Sophie will be 7 in March and the  plan is for a cupcake decorating party. After the huge number of children that came to her party last year I made myself a promise that this year she would only be allowed to invite 9 children (plus her making a grand total of 10).

The theme this year is cupcakes - the plan being that they will decorate their own cupcakes (plus some other things that Sophie has requested). First step: the invitations ...

I searched far and wide for inspiration for the invitations and found some very cute 3D ones but they were only available in Australia, so I decided to make my own version.
I loved the idea of the awning covering the invitation text and decided to decoupage a few bits to add dimension to the rest of the invitation; you can't tell from the photos but the cupcake, teapot, hair flower, bunting and chalk board were all raised up with foam pads. The finishing touch was a piece of card folded at the back of the invitation so that it could be stood up.

I was very pleased with the finished invitation and have had some lovely comments back, which made it worth the effort.
Next step, cake decorating place mats and aprons ...

© 2013 Nicola Noble: Please observe the rules of copyright and blog etiquette. If you use my ideas or images, please link back to my blog. And do let me know - I'd love to take a look.

Monday, 19 March 2012

Moshi Monster 6th birthday party

Has it really been a month since I last posted anything? The silence was due to me working hard for Sophie's 6th birthday and party, but now that it's all over I can get back to normality (?) and give the low down on the fruits of my labour...
Sophie decided some time ago that she wanted a Moshi Monster party and no amount of persuading could get her to change her mind! So after trawling the net and being singularly unsuccessful in finding any ideas to "borrow" I had to create a party from scratch.

I was lucky that Moshi Monster party plates/cups/napkins recently became available and our local Sainsbury's stocked them at a better price than most of the online party companies. But I begrudge paying for invitations, especially when you only get eight in a pack and Sophie wanted to invite 20+ kids. So, as in previous years, I created my own. They seemed to be a big hit with the invitees!
So, the party went something like this (and thanks to our in-house party entertainer Jase who did a fantastic job as always in running the games and entertaining the kids - saves us a fortune not having a "professional" entertainer!) ...

Hanging dougnut game
As the party was straight after school on a Friday I knew I had to get food into the children as soon as possible, so we started with a really old game that has the children trying to eat a ring doughnut hanging on a string, without using their hands. This was the first time the children had done this and they really enjoyed it. I think most of them embraced the challenge and I didn't see any cheating!!
Find the Moshling game
I found some good quality images of moshlings which I put onto a check list for each child. I included the moshling names, as not all the children know as much about moshlings as Sophie does. They then had to find the small pictures of moshlings hidden around the room. Some were obvious, others downright tricky but they all seemed to find them in the end.
Once the game was finished, I collected the check lists and then handed them back out at the end of the party for them to put in their party bags and keep.

Pass the Parcel
I still haven't been brave enough to not put a prize in every layer and this meant that the game went on for what seemed like an eternity. If (and that's a big IF) Sophie has a party again next year, I swear that I will only do a small number of layers and put forfeits in some of the layers (after all they should all be able to read easily by the age of 7).

Oddie, Hansel and Cutie Pie (also known as Pip, Squeak and Wilfred)
We didn't get a chance to play this game, which was a shame as I wanted to see how well the children managed to understand the game but I thought I would include it here in case anyone else wants to borrow the idea.

The children forms teams of three and each member of the team calls themselves either Oddie, Hansel or Cutie Pie. The teams form a large circle with a bean bag in the middle. One name is called and that person has to run around the outside of the circle back to their team who join hands and make an arch. The running team member runs under the arch and tries to get the bean bag before anyone else. That team wins a point. First team to 3 points wins.

In addition to the organised games, I set up a couple of tables with some Moshi Monster colouring sheets and colouring pencils and a selection of temporary tattoos so that the kids had something to do when they had finished their doughnut challenge and Find the Moshling hunt.

The party bags were very simple this year and included:
- a pack of Moshi Monster Mash up trading cards (bought from The One Stop Moshi Monsters Shop with a fantastic 10% discount courtesy of Mummy Bird)
- a postcard from a booklet of Moshi Monster postcards
- and a selection of traditional sweets: black jacks, fruit salad, sherbet and mini love hearts.

The party seemed to go well and all the children seemed to have fun (apart from the birthday girl having a few meltdowns - but hey, who doesn't cry at their own party!) and they did really enjoy the Find the Moshling game and the doughnut game. I don't think I would do another party after school on a Friday ... I do think at this age that they were all tired and that it did impact on the children's behaviour/attention spans.

Next, the cake ...

© 2012 Nicola Noble: Please observe the rules of copyright and blog etiquette. If you use my ideas or images, please link back to my blog. And do let me know - I'd love to take a look.

Monday, 9 January 2012

A Very Hungry Caterpillar birthday party

Justin turned three on Saturday (where has that time gone?) and I organised a Very Hungry Caterpillar party to celebrate.

As his birthday is straight after Christmas and New Year I have learned over the past two birthdays to get organised early to avoid unnecessary stress and so I started a board on Pinterest some time ago and pinned a few ideas. In reality not many of them made the cut but it was still fun finding out what other people had done.

I got the inspiration for the invitations here but played around with various VHC images and ended up with something that I was really pleased with.

Somehow the numbers at the party snowballed (no pun intended!) and we ended up with eight 2 to 3 year olds, three older 5 and 6 year old siblings, party guest's mums and Justin's grandparents. Thankfully, it was a sunny day and we were able to use the kitchen, conservatory and garden patio. 

I had lots of plans to make VHC bunting but in the end I fell in love with the paper lantern caterpillar idea found here. I hung the lanterns up with thread suspended between two cabinets and fixed some spotty wrapping paper behind to hide a lovely but detracting picture. It was quite effective (although I couldn't get the eyes quite right) but the lanterns were smaller than I expected and in hindsight I didn't think it was worth the extravagant c.£20 it cost to buy them.
There was no real structure to the party, the little ones were allowed to play with toys I'd left out for them but I did include a couple of games for them. We had the obligatory pass-the-parcel and also a great game called Pop the Bubbles. I found these on the Party Pieces website and they are basically rectangles of large bubble bubble wrap that the children have to jump up and down on. Not surprisingly, they all had great fun popping the bubbles. I will definitely do this again but may buy my own roll of large bubble bubble wrap for next time!


I also planned a version of musical statues with printed sheets of numbers: when the music stops you call a number out and the children have to stand on that number. We didn't have time to play this but I might play it with Justin anyway to help him learn what numbers look like.
The party bags were spotty cellophane bags and I put VHC sticker sheets, a VHC pin badge, a small bottle of bubbles, a small packet of sweets and a multi-coloured colouring pencil and VHC colouring sheet in each.
Sadly I forgot to take many photos, and didn't even manage to get one of the table before most of the food had been eaten.
I did manage get a photo of the older children having a great time eating their food outside as a picnic.
The party went smoothly and most importantly all the children had a great time, especially the birthday boy.
© 2012 Nicola Noble