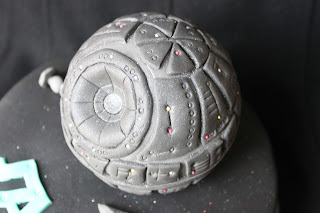
It was recently that time of year again when Mr Snowballs put in his request for his birthday cake with clear instructions that he wanted a Star Wars Death Star cake. I always argue that the sort of cake he wants should be reserved for "special" birthdays (such as my niece's 18th, mum's 70th, sister's 50th, best friend's 40th) or for our children's birthdays. As 40 something is neither, I always try to persuade him to be happy with a "norrmal" cake but it never works. So Star Wars Death Star is was ...
I didn't have the courage to make the whole cake into the Death Star but opted instead for a round cake with the Death Star on top. Mr Snowball informed me that if I wasn't going to do a "full size" Death Star then he also expected an Imperial Star Destroyer - he doesn't ask for much really!!
I have to admit that I had great fun making this cake and I was really pleased with how it came out.
The bottom sponge was gluten-free Victoria sponge with a mashed banana to help add moisture (gluten-free cakes are always so dry!). I covered the cake board in turquoise fondant and the cake in black fondant over Betty Crocker chocolate fudge icing (I seem to have an aversion to making buttercream after the gallons I had to make for Sophie's birthday). Then came the fun part.
I moulded the Death Star out of rice krispie treats (RKT); I have never used these before for my cakes but thought it would be easier than trying to bake a large cake ball. It was very quick and easy to do - I made the RKT before the school run one morning and by the time I came back it had set enough for me to start making the Death Star. Justin has some Lego Star Wars planets and I used one of these to mould the ball, greasing each half liberally before squashing the RKT in them. I read in a few recipes that it is a good idea to crush the rice krispies before mixing with the marshmallows and butter and I will definitely do this next time as there were quite a lot of divots on the outside of the ball. Also next time I will try to leave it longer to harden up, although the ball shape didn't distort too much.
I pushed the two halves of the soon-to-be Death Star together, emphasised the death ray hollow a bit more with my thumbs and then covered the ball in light grey fondant. I did this by cutting two circles of the grey fondant and placing over the RKT (I got the right size by using the Lego Star Wars planet as a guide), joining them across the middle of the ball. I then rolled out dark grey fondant and cut various shapes out of it: I cut circles to fit into the death ray hollow bit (marking it with the back of a knife before I put it on); a long strip to go around the middle of the Death Star; a circle cut into pieces of pie for the top; and almost-square shapes to go around the outside. I worked out that the squares needed to have angled sides to fit onto the ball. Once they were all on, I added random markings with the tip of a #2 icing nozzle and a knife and added tiny non-pareils (which was very fiddly!).
I made the Imperial Star Destroyer by stacking various cut and rolled pieces of fondant together, some white balls of fondant at the back with some silver balls and marking it with a knife. I also added a tiny Tie Fighter.
The finishing touches were Mr Snowballs' name in Star Wars style font in the turquoise fondant and copious amounts of sparkle to brighten the whole black/grey thing.
And the verdict? For someone who has high expectations, Mr Snowballs seemed suitably pleased with his cake and I had fun making it. Maybe next time I will be brave enough to tackle a whole Death Star cake ...
Subscribe to:
Post Comments (Atom)


No comments:
Post a Comment