Pages

Friday, 19 December 2014

Twinkle, twinkle little star - Christmas gifts for BFFs


Each year I organise for Sophie to give some of her friends little Christmas gifts.

Last year we made "stained glass window" gingerbread biscuits ...

... the year before it was marshmallow snowmen gifts ...
and the year before it was reindeer noses:


This year I came across some pretty sparkly ribbon bracelets in a local shop. I bought one for each of her three BFFs (and one for her of course) and as an extra bonus they came in matching chiffon bags.

We personalized them with a sparkly star (template made by Sophie) and added a poem:
Twinkle twinkle little star
Thank you friend for who you are.
Bracelet sparkling like that star
Friends forever, that's who we are. 

© 2014 Nicola Noble & Little Love Cakes: Please observe the rules of copyright and blog etiquette. If you use my ideas or images, please link back to my blog. And do let me know - I'd love to take a look.

Thursday, 18 December 2014

It's beginning to feel a lot like Christmas ...

It's that time of year again when we get little visitors to our house ... Sally and Colin, the Magic Elves, joined us again for what is turning out to be another fun and mischievous December. I cannot believe that it's their fourth year with us!
They didn't arrive on the 1st December this year as they were snowed in at the North Pole, but they did manage to send Sophie & Justin a telegram to let them know they were arriving soon, posted down the chimney with a few snowflakes still attached.
The next night they provided blank letters for Father Christmas, a gentle reminder for the children to write their letters. They also gave us a lovely felt envelope to pop the letters in to make sure they reached FC super quick.
They then got Father Christmas to read The Great Dog Bottom Swap story to all the doggies in the house. Mr Snowballs has been telling us all that story for years and it is good to see it's actually real!
Sally and Colin then decided to have fun on our half constructed Christmas tree with a game of Connect 4. It looked to be a tie...
We are not sure what happened on the sixth night, but we woke up the next morning to find that Sally and Colin had shrunk and were playing mini Connect 4. It was a tie again!
 
Sleepover at the Grandparents found them hiding under a cushion den under a duvet...
Back home again and they had a marshmallow toasting session over the playmobil pirate campfire, using pirate swords as skewers.
We were beginning to wonder if Sally and Colin were ever going to return to normal size again, when we discovered them during the day with a bowl with some giant marshmallows and a note Eat Me! Sophie and Justin obliged and ...
 
... hooray, the next day they were back to normal. Still toasting marshmallows but this time normal size elves with normal size marshmallows!
On their tenth night with us, Colin showed us what his job at the North Pole is, by putting on his work clothes. It turns out he is a toymaker, and he made two wooden dancing elves. Thankfully the paint was dry by the morning.
The Elves hid very well the next night - they were in the bathroom cabinet and they had decorated some toilet rolls to look like snowmen ...
It was Sally's turn to show us her job at the North Pole, when she donned her Cookie Maker apron and chef's hat and made some yummy pecan and caramel plaits for breakfast. Sadly, the kiddies didn't  ike them,  so she whipped up a couple of pretzels while we were all out, ready for the post-school hunger pangs.
On the 13th night, Sally and Colin were very, very naughty. They decided it would be funny to draw all over my and Mr Snowballs face. The children thought it hilarious, us not so much. I only forgave them because it washed off. Thank goodness they didn't find the Sharpies!
Sally was Cookie Maker again the next night and made some yummy white chocolate cookies for our resident Cookie Monsters. Sally and Colin obviously didn't want to scare them, as they were hiding on the other side of the kitchen window watching them.
They decided to make a list on the white board of naughty or nice teddies. Sophie and Justin's best favourites were on the Nice list, but I do think Sally and Colin were a little harsh on the Naughty list - after all Sally had just made cookies for Cookie Monster and it's not Kiwi's fault he jumps on Sophie's bed - he can't fly!
Being mischievous again, they donned burglar masks and had bags labelled Swag, then climbed some ropes to steal money from Sophie and Justin's money boxes. I think they must have run out of time though as they didn't manage to get any ...
Two nights ago Sally and Colin were obviously dreaming of warmer climes and set up a sunbathing spot: suncream, tall drinks, sunglasses, coconut and "sun'.
And last night, they somehow managed to get hold of some cool snowmen and Father Christmas cups from Costa Coffee and played a game of toss with giant snowball marshmallows and mini marshmallows.
I can't believed there's only one week to go until Sally and Colin head back to the North Pole with Father Christmas but there is still plenty of time for Elf-tastic frolics ...

© 2014 Nicola Noble & Little Love Cakes: Please observe the rules of copyright and blog etiquette. If you use my ideas or images, please link back to my blog. And do let me know - I'd love to take a look. 

Monday, 3 November 2014

Gluten free pumpkin cupcakes with pumpkin frosting


It's that time of year again when we buy our pumpkins from the local store, spend an hour or so scraping away the inside and carving a face on it only to have to throw it all away a day later. How sad!

I can't say I am that fond of pumpkin. I always feel it is such a waste to throw the perfectly good flesh away but whenever I try to use it for some recipe or other it always comes out yuk! Pumpkin soup - not great (although the little snowballs liked it), roasted pumpkin - a sloppy mess ... so where am I going wrong?

I came to the conclusion that it is not me, it is the pumpkin's fault. I bought a can of pureed pumpkin just to prove to myself that it is the pumpkin and made a discovery. Pure pumpkin has a very specific taste - not one that I am keen on personally - but if you add lots (and I mean lots) of spices, especially cinnamon, it can be quite nice!

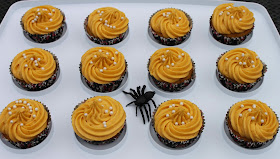
So yesterday, we were invited to a post Halloween party and I decided to make pumpkin cupcakes using the canned pumpkin. And as the cupcakes didn't use the whole can, I used the remaining pumpkin for the buttercream frosting. And they tasted GOOD. So good I might even have a go at pumpkin pie sometime (when I master gluten free pastry!). But I still need to figure out how to get the scooped remains from the Halloween pumpkin into a puree that I can cook with?

There's always next year ...
So here's the recipe for the pumpkin cupcakes with pumpkin buttercream:

Pumpkin cupcakes

Ingredients
280g self-raising flour/gluten free flour
1 tsp ground cinnamon
1/2 tsp ground nutmeg
1/2 tsp ground ginger
1/2 tsp ground cloves
1/2 tsp ground allspice
1/2 tsp salt
1 tbsp baking powder
1/2 tsp bicarbonate of soda
110g margarine
200g caster sugar
5 tbsp brown soft sugar
2 eggs (room temperature)
180ml milk
250g pureed pumpkin (canned is fine)


Preheat the oven to 190°C / Gas 5. Place 24 paper cases in muffin tins.

Mix together the flour, spices, salt, baking powder and bicarbonate of soda and set aside.

Beat the butter, caster sugar and brown sugar with an electric mixer in a large bowl until light and fluffy.  

Add the eggs one at a time, allowing each one to blend into the butter mixture before adding the next. 

Remove the bowl from the mixer then stir in the milk and pumpkin puree and then stir in the flour mixture, mixing until just incorporated. 

Pour the cupcake mixture into the prepared muffin cases.

Bake in the preheated oven until golden and the tops spring back when lightly pressed, about 25 minutes. Cool in the tins for 5 minutes before removing to cool completely on a wire rack.

While the cupcakes are cooling, make the icing (see below) then when cool pipe the pumpkin buttercream onto each cupcake and decorate with sprinkles or jelly worms or other suitable toppings.

Pumpkin buttercream

Ingredients
90g unsalted butter
 100% pumpkin puree
900g icing sugar
1/2 tsp vanilla
1/2 tsp cinnamon
1/4 tsp nutmeg

Cream together the butter and the pumpkin puree in an electric mixer, until the butter is a light orange colour. The pumpkin won't totally combine at this stage so you won't be able to get a completely smooth mixture even after several minutes but don't worry about it, it will blend well once the icing sugar is added.

Beat in the vanilla, cinnamon, and nutmeg.

Add the icing sugar and mix well until smooth. I always add the icing sugar and mix by hand first to avoid clouds of icing sugar billowing out and settling across my whole kitchen. Once the icing sugar has started mixing in to the point that it doesn't fly everywhere, I then finish it off with the beater on my trusty Kitchen Aid until it's smooth and blended evenly.


Little Love Cakes creates high quality and bespoke cakes for any celebration in the Twickenham/ Teddington/ Richmond area. Visit us on Facebook at littlelovecakeslondon.

Each cake is baked and decorated using high quality ingredients and is decorated with care and great attention to detail - we know it's the little things that make a cake special and unique. 


© 2014 Nicola Noble & Little Love Cakes: Please observe the rules of copyright and blog etiquette. If you use my ideas or images, please link back to my blog. And do let me know - I'd love to take a look. 

Friday, 5 September 2014

A day or two at the beach ...

Over the summer I had orders for two beach themed cakes. The first was for a lady's 50th birthday and the brief was a beach theme with beach huts and lots of pink. The second was for a man's 40th birthday and anything beachy was fine. The resulting cakes show how two similar sounding orders can turn out very differently with a little imagination ...

My initial idea for the beach hut cake was to have three huts side by side on the top of the cake but when it came to putting it all together, I soon realised that three huts just weren't going to work with the beach themed accessories that the customer also wanted - they would have all ended up being very small and hardly noticeable. So a redesign later and the three became one, incorporating lots of pink and some other bright colours to help stop it being too, too girly.
The accessories included a beach mat, a pair of flip flops, a beach towel, a beach bag, a beach ball, a sun hat and a bucket and spade.
The beach hut was also cake and I added a wood effect door and pink window shutters. I cut out the window shape and placed a piece of striped fondant inside to match the beach towel, then added window bars and some piping gel to give a glass-effect.
The sand was created by drying the cake off-cuts in the oven on a low temperature for about 30 minutes then blitzing them into crumbs. I then glued this onto a piece of fondant on top of the cake that I had mixed to a similar colour (pale yellow and teddy bear brown ready coloured fondant in about a 2:1 ratio). There was enough sand for my second beach cake the following week, which I stored in an air tight container until I need it.

The second cake was for a man's 40th birthday. The brief was to have number cakes and a beach theme. Knowing the birthday boy was an Australian, I decided to have a little fun with this cake ...
I created the numbers by baking a circle for the 0 and a rectangular cake for the 4, which I then cut into shape using a template I had made from greaseproof paper. The bottom of the cakes were decorated with a darker blue fondant "ribbon" with waves. I topped each cake with the sand coloured fondant and the cake crumbs.
The 0 was made by cutting a circle out of the middle of the top layer of the round cake which I then covered with the turquoise icing and filled with piping gel and a shark's fin. I also added a surf board (I was so pleased with my unique design and the birthday boy's name worked really well on it, don't you think?).
Other beach decorations included a beach towel, a pair of thongs (flip flops), a bucket and spade, some sandcastles and a selection of fondant shells.
I really like the way the beach towel rolled up and I added a couple of rows of stitching along the edge.

So each cake with a beach theme and some similar elements came out very differently and both recipients were very happy with their cakes.

I wonder what cakes Autumn will bring ...


Little Love Cakes creates high quality and bespoke cakes for any celebration in the Twickenham/ Teddington/ Richmond area. Visit us on Facebook at littlelovecakeslondon.

Each cake is baked and decorated using high quality ingredients and is decorated with care and great attention to detail - we know it's the little things that make a cake special and unique. 


© 2014 Nicola Noble & Little Love Cakes: Please observe the rules of copyright and blog etiquette. If you use my ideas or images, please link back to my blog. And do let me know - I'd love to take a look. 


Friday, 27 June 2014

Let's get Minecrafting (cake) ...

I have had great fun making a couple of Minecraft cakes recently. Minecraft is a global phenomenon blocky freeform building game on the computer, Xbox and handheld devices.

The first cake was a Creeper face.

I baked a square cake and covered it in dark green fondant then created a mosaic of different coloured green squares for the Creeper face.
Creating the Creeper mouth involved folding some greaseproof paper into squares and marking the ones that needed to be cut out of black fondant. I found a Minecraft-esque font for the birthday boy's name and cut this out of grey fondant.
To finish the cake, I added some more green squares of fondant randomly around the sides of the cake...

The next cake included characters from the Minecraft game. The main character is called Steve. In addition, I included the iconic Creeper and, the birthday boy's favourite, a piggy.

I found some printable 3D paper characters (here) which, when made up, proved to be perfect proportions to copy for the cake. The characters were very detailed and took quite some time but were well worth the attention to detail. And no, I didn't get Steve's eyes wrong, he actually does look like that!

I made them ahead of the due date for the cake to allow them to harden and be able to stand on top of the cake and added some dried spaghetti to fix Steve's head to his body and to all the feet to help them stand on the top.

For fun I also added some detail to the inside of the cake. One aspect of the game is to go mining for ores and the ores can be found at diffent depths. So when the birthday boy cuts into the cake, he will find diamond, gold, redstone and iron ore. Lucky him ...
As with the Creeper face cake above, I also added the birthday boy's name in a Minecraft-esque font and attached it to the side of the cake.

I wonder what Minecraft cake I will get to do next ...

© 2014 Nicola Noble: Please observe the rules of copyright and blog etiquette. If you use my ideas or images, please link back to my blog. And do let me know - I'd love to take a look.