Pages

Friday, 21 December 2012

2012 Magic elves update 4

In amongst decorating my Christmas cake and making Snowmen gifts for Sophie's friends, I have also been keeping on top of the mischief and fun that our elves have been getting up to:

- they made chocolate rice krispie Christmas tree treats
 - they got into a pickle with wrapping paper and sellotape
- they had fun with our snowmen toys and got us tickets to see The Snowman in London just after Christmas - amazing! Not sure Mr Snowball was too happy though when he realised it was a ballet!
- they sent an e-mail to Father Christmas with a report on Sophie and Justin - there was still slight room for improvement in both!
- they created a game with marshmallow flumps and mini marshmallows
 - they hid in my crochet bag - it took the kiddies a little while to find them
- we found a sparkly jar of "Magic Restoring Powder" with instructions for use:
Sprinkle invisible magic powder onto elf
Give elf a big hug and kiss 
Put into the washing machine and close the door
Leave the room so the magic powder doesn’t accidentally work on you
Wait 5 minutes - you must not peek during that time
Hey Presto - your elf should be back to normal!

... and then found the elves in the washing machine. They had shrunk and the colours/clothes had all got mixed up. Sophie thought this was the funniest thing yet ...
... thankfully the Magic Powder worked and the elves were restored to their former selves. We had to follow the instructions to the letter and I was not allowed to peak before the five minute timer went off.
 - following their shrinking the elves decided they needed to cheer themselves up and went mad with chocolate and sweets ... I have never seen so many empty wrappers in once place!
 - and last night they had fun making origami water balloons and "chatterboxes" - I will have to learn how to make the water balloons as I don't know that skill yet!
I can't believe there are only three more nights before Sally and Colin head back to the North Pole with Father Christmas when he comes to visit us on Christmas Eve - it has gone so quickly.

© 2012 Nicola Noble: Please observe the rules of copyright and blog etiquette. If you use my ideas or images, please link back to my blog. And do let me know - I'd love to take a look.

Sunday, 16 December 2012

Marshmallow snowman gifts

Last year I made little gifts for Sophie's close friends at school (see my post Reindeer noses) and I wanted to do the same thing again this year. I spent a happy time searching the internet and Pinterest and came up with marshmallow snowmen.
I liked the design here but didn't want the message. It took a bit of fiddling to get the head shape right, but eventually I ended up with a good size that fitted horizontally onto an A4 sheet of paper (so I could get two toppers from the same sheet and not waste lots of paper). I cut a stencil and drew around it, folded it in half then used black paint for the hat and for the eyes (I used a small carrot to stamp the eyes). I cut out brims that were slightly wider than the hat in black corrugated card and a carrot nose in orange card.

I put about 25g of mini marshmallows in a Wilton cake pop bag and added some food glitter/sparkle powder. I then folded over the top of the bag and stapled the snowman topper onto the bag where the brim would be attached. I attached the orange nose using foam pads to lift it slightly and glued the black cardboard brims to the front and back, making sure they lined up. Finishing touches included a ribbon that wrapped around the hat above the brim, Merry Christmas and some snowflakes stamped in silver onto the black hat.

Sophie then wrote her friends' names on the back of the topper, popped each snowman into an envelope and placed them into the school Christmas postbox. Her friends had a lovely surprise when they opened their book bags when they got home from school that night.

© 2012 Nicola Noble: Please observe the rules of copyright and blog etiquette. If you use my ideas or images, please link back to my blog. And do let me know - I'd love to take a look.

Christmas cake 2012 - baubletastic ...


I have just finished decorating my Christmas cake for this year - hooray.

As in previous years, I bought a plain fruit cake, then covered it in marzipan and white fondant icing ready for the decorating.

The theme this year is baubles. I searched the internet and pinned various ideas here. I then designed it on paper and made the various bauble shapes, leaving them to firm up before "blinging" them up with cake glitter (although this is no longer allowed to be called edible as your body doesn't digest it, it is non-toxic and only means you end up with sparkly p**!!). The glitter looks great but gets everywhere and continues to fall off every time you knock the decoration/cake, but I guess it doesn't matter as is there such a thing as too much glitter? In fact, I finished the cake off with an extra sprinkling of my favourite glitter (EdAble Art Disco Blue Violet).
I decided to be very traditional with the colour scheme and kept to red, green and gold. Initially, I was only going to do the design on the top but decided I wanted to decorate the sides too and the whole thing was finished off with a red ribbon round the board.
© 2012 Nicola Noble: Please observe the rules of copyright and blog etiquette. If you use my ideas or images, please link back to my blog. And do let me know - I'd love to take a look.

Wednesday, 12 December 2012

2012 Magic elves update 3

Since the last post the elves have been both good and very naughty. Here's what they've been up to ...

- hiding in the cereal packets at breakfast time
 - hiding in our new car. The children couldn't find them anywhere in the house and were convinced they had gone back to the North Pole!
 - playing noughts and crosses (or tic-tac-toe if you are American!)
 - they brought new elf clothes for Sophie and Justin's favourite teddies and sat on the sofa reading a book about Santa's elves
 - and last night they decided to go fishing in the bathroom sink. The fish turned out to be carrot flavoured (Sophie was brave enough to try one)!
Still just over a week and half to go and more mischief on it's way. Bring it on!

© 2012 Nicola Noble: Please observe the rules of copyright and blog etiquette. If you use my ideas or images, please link back to my blog. And do let me know - I'd love to take a look.

Friday, 7 December 2012

2012 Magic elves update 2 ...

The elves have had lots of fun in our house this first week and are keeping the children amused with their antics:

- they decided to have a bath in front of the fire. We are not sure who took the picture in the middle of the night but the children think it must have been their new Rudolph teddy as he was nearby and had a huge smile on his face the next morning, looking very guilty ...
 - they decided to make snow angels out of dessicated coconut.
- they relaxed by watching all our Christmas DVDs with drinks and popcorn.
- they disappeared after making a huge pile (and mess) of tinsel. We couldn't find them anywhere ...

... until we spotted a hand peeping out from one of the tinsel mountains!
- and last night they had fun with our toilet rolls!
I wonder what mishief next week holds for our lovely magic elves?

© 2012 Nicola Noble: Please observe the rules of copyright and blog etiquette. If you use my ideas or images, please link back to my blog. And do let me know - I'd love to take a look


Wednesday, 5 December 2012

It's that time of year again - the magic elves are back!

Saturday was the 1st December and our very friendly postman delivered a special parcel to Sophie and Justin, all the way from the North Pole ...
... the Elves arrived with a letter from Santa:

Dear Sophie and Justin

Colin and Sally had such a lovely time last with you last year that they asked to be sent to you again this year.

Please take care of them and don't forget that they will be reporting back to me as to whether you have been good or naughty. Please make sure they don't get up to too much mischief and have fun with them.

Love Santa


And true to nature, our cheeky elves have already been up to mischief - albeit very helpful mischief on the first night: they put up our Christmas tree, complete with lights and then started putting some of the decorations ...

What will they do next I wonder?

© 2012 Nicola Noble: Please observe the rules of copyright and blog etiquette. If you use my ideas or images, please link back to my blog. And do let me know - I'd love to take a look

Saturday, 17 November 2012

When the old ways are still the best!

I always remember part of getting ready for school as a child involved polishing my school shoes on a Sunday night, ready for the week ahead. I used find it a real chore but as an adult with my own children, I see why my mum made us do it: spending what amounts to very little time and effort in using proper polish and a bit of elbow grease to polish up Sophie's school shoes each Sunday night ensures the shoes look good right up until her feet outgrow them.
It does make me feel somewhat old-fashioned, since I haven't yet met another school mum who does this: if they clean their children's shoes at all, they use the instant shine stuff! But doing it properly works! First day of school with brand new shoes and home she came with the toes all scuffed. And if your child is anything like my monkey then it's not just the toes that get scuffed but the sides as well from gripping any pole she can climb.

After ignoring Sophie's new shoes for the first few weeks and the toes getting worse and worse, I pulled out the good old Kiwi black shoe polish, rubbed a healthy amount all over the shoes and left them for ten minutes. A quick polish with the buffing brush and they gleamed like new.

So no matter whether it's old-fashioned or not, the very fact that it works is why the shops still sell proper shoe polish and shoe brushes and I'm not forking out every term for a new pair of shoes! And it isn't just school shoes that benefit from a bit of polish...
© 2012 Nicola Noble: Please observe the rules of copyright and blog etiquette. If you use my ideas or images, please link back to my blog. And do let me know - I'd love to take a look

Sunday, 4 November 2012

Halloween ...

Halloween fell right in the middle of half term which was fun.

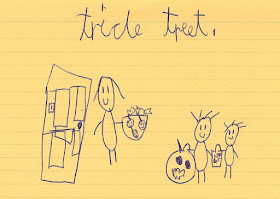
We decorated the house a little and Sophie drew lots of fun pictures which we stuck in the front window. I especially love the two below with the wonderful spelling and the fact that she thinks it's "tricle treet" not "trick or treat"!
I also carved a pumpkin and for the first time ever, I managed to keep the scrapings from inside (not sure if it was just a better quality pumpkin as it did come from Waitrose!) I saved and roasted the pumpkin seeds and steamed and pureed the pumpkin flesh to use at a later date; I will be searching out some yummy things to do with it in the next week or so. Sophie helped me choose a face online and I printed it and pricked out the design with metal cocktail stick before using the grapefruit cutter to cut the face out. It turned out suitably scary and I even used the cut out mouth to make a tiara/hair fixed on the top.
Our road is becoming famous locally for the great trick or treating and we made sure we went out nice and early before all the sweets were gone. It seemed like everyone in the street with children was out and half those without children took part with bowls of sweets which was great. Both Sophie and Justin have got enough sweets to last them to Christmas, though not as many as some teenage boys I saw with a supermarket carrier bag that was overflowing - obscene really!

I took some photos of my little trick or treaters - cute and scary ...
I love how the movement in the picture below turned them into ghosts - very scary ...
And finally, I just couldn't resist including this fab Halloween picture of Snoopy, still my favourite of all cartoon characters ...
© 2012 Nicola Noble: Please observe the rules of copyright and blog etiquette. If you use my ideas or images, please link back to my blog. And do let me know - I'd love to take a look

Wednesday, 17 October 2012

Recapturing childhood memories with a quince ...

There is a quince bush in the front garden of an old lady who lives in our road and every time I walk past it I remember the quince jelly my Grandad used to make when I was a child; it was a strange, exotic jam that I remember being an acquired taste but one I loved.
This year I decided I was going to try to make it and early on when the flowers had finished and the first little fruit were beginning to come through, I asked the old lady if I could have the fruit when they were ripe. Every time I walked past it on the way to and from school I watched those fruit grow and begin to go from deep green to lime green to a hint of yellow. I have to admit I didn't know much about quince as a fruit but I now know that fruit is ripe when it turns yellow and is normally ready to pick in October, preferably just before the first frosts.

Imagine my dismay when literally days before I was planning to pick the ripe quince, they all disappeared! There were still some fruit on the bush but tucked away and nowhere near as ripe as the beautiful yellow/orange fruit I had had my eye on, so I had to be patient and wait a little while longer. A few weeks on and this week I knocked on the door and asked if I could take the remaining fruit (it turns out the old lady's neighbour had taken what I considered to be my fruit). They are still not as ripe as I would like but apparently they do continue to ripen once picked so I decided to take my chance.

My parents also have a quince bush in their garden, so I raided that at the weekend too. Their fruit were much, much, much smaller but beautifully ripe so I decided to start making some things with these while the other, bigger fruit ripen.
I started by experimenting making some quince pickle. I peeled, cored and chopped the quince, which being quite small was a labour of love. I still can't get over how many seeds such tiny fruit had in them. I didn't have the cider vinegar the recipe calls for but did have half a bottle of white balsamic. I also added sugar, juniper berries and black peppercorns and I think the resulting half jar of pickle is good and I will definitely make some more with the bigger fruit and cider vinegar.
Although most pickle recipes say to leave for three months to let the vinegar mellow this one can be used immediately. It has a kick from the vinegar but this is mellowed somewhat by the flavour of the quince.
I then started on the quince jelly. This is much easier as you cook the quince in their entirety - no peeling or coring. I halved them and washed them, then put them in a saucepan with enough water to cover them and simmered for about 40 minutes until the fruit had completely disintegrated; all that was left were the skins and seed pods.

Then came the fun bit where you strain the juice from the fruit. I used a (new) square muslin cloth left over from when Justin was a baby and tied string to the corners then strung it up over one of the kids chairs on top of their craft table! I placed a large pan underneath and carefully spooned the cooked quince into the bag. I then left this overnight to drip, resisting the urge to squeeze the juices through so that I only got juice and no pulp.
The next morning, I measured the quince juice and added the same amount in sugar (mine was about two and three quarter cups) and stirred until the sugar had dissolved. Then I heated it all up and although the recipe I was following said to simmer once brought to the boil, I found after about 15 minutes that it just wasn't getting up to temperature (it needed to be about 105C) so I increased it to a boil and left it for another ten minutes or so.
It turned from a pale cloudy yellow to a rich golden colour.


I then tested if it had reached setting point by dropping a teaspoon full onto a plate I had previously put in the freezer. After about 10 seconds, the jelly had formed a skin and wrinkled when I ran my finger through it so I knew it was ready.

I let it cool for about 5 minutes then carefully poured it into four jars, two big and two mini, and there was just enough left over to pour into a pot for immediate testing!
And the verdict? In honesty, I don't remember what my Grandad's quince jelly used to taste like but the jelly I made yesterday is good.  It is still an acquired taste but I love the sharpness that comes through every mouthful. 

So now I have to decide what to do with the remaining ripening quince I have - more pickle or jelly or both?

© 2012 Nicola Noble: Please observe the rules of copyright and blog etiquette. If you use my ideas or images, please link back to my blog. And do let me know - I'd love to take a look.